Can you believe I didn't get any burp cloths at my baby shower? I know I could just use a blanket, but I wanted a burp cloth. I didn't get these made before the baby came, but my mom whipped these out while she was staying with me to help out. So this craft is courtesy of my amazing mom.
Aren't moms amazing? My mom was here for a few days with me and she did SOOO much. My mom is honestly SuperMom. She deep-cleaned my oven, swept and mopped my kitchen, cleaned out all the old food in my fridge, along with a million other small projects - and all while taking care of me and a new baby. I wish that some day I am half as amazing as my mom. Thanks again Mom!
I often am asked "Did you make that?" when showing friends various things. I started this blog so I can show off some things I've made and maybe offer some ideas to spark your creativity!
Wednesday, December 8, 2010
Monday, December 6, 2010
Cinnamon Christmas Ornaments
A cute and cheap Christmas ornament idea.
These smell amazing. They're basically just salt clay dough with cinnamon added. Here's the recipe:**I know I found this recipe online a few years ago, but I cannot remember where I found it to give proper credit**
- 1 1/2 c. all-purpose flour
- 1 c. salt
- 1/2 c. ground cinnamon
- 1/2 teaspoon cinnamon oil (increase amount for more fragrant cookies) [I found this at Walmart on the aisle with the candles and incense, and it was $1 or less]
- 1 c. water
- Mix dry ingredients together in a large mixing bowl. Add water gradually and stir continuously until completely absorbed. Knead for a few minutes. Chill, covered, for 1 to 2 hours in the refrigerator before proceeding.
- Roll dough flat on parchment paper until 1/4 inch thick. Cut designs with a cookie cutter or freehand with a small knife. Pierce a hole in the top with the end of a chopstick.
- Place cookies on parchment paper. Bake at 250 degrees for 1 to 3 hours. Remove when very firm and set aside to cool. Thread with string or ribbon and hang on tree.
And one more photo of them hanging on our Christmas tree, because it looks so cute and Christmasy:
Sunday, December 5, 2010
Diaper Organizer
We don't have a changing table. We have a changing pad on the top of a dresser. More economical and it works for us. The only problem was the lack of storage. Problem solved! Hanging on the wall above our changing pad you'll find this lovely diaper organizer I sewed:
Where we can keep our diapers and wet wipes within a hand's reach while the baby is being changed. Already it's been a life saver for us.

Saturday, December 4, 2010
I'm Back
The reason there have been no posts the last little while:
But now I'm back, and there's plenty for me to catch up on. Check back soon for all the finishing touches of the nursery and some Christmas crafts I completed before this one arrived.
But now I'm back, and there's plenty for me to catch up on. Check back soon for all the finishing touches of the nursery and some Christmas crafts I completed before this one arrived.
Wednesday, November 17, 2010
Monday, November 15, 2010
"Greeter Deterrent"
These are all over the internet right now. And I wanted to add my own little touch to the idea. LOVE IT!
Call it what you will... car seat canopy, car seat tent, etc. My favorite name for this is "Greeter Deterrent" because of this post on Cluck Cluck Sew. Too funny.
Call it what you will... car seat canopy, car seat tent, etc. My favorite name for this is "Greeter Deterrent" because of this post on Cluck Cluck Sew. Too funny.
Thursday, November 11, 2010
Boppy
Yup, you guessed right. It's homemade. It was super easy, and a whole lot cheaper than buying the "Boppy" pillow in stores.
Giving credit where credit is due, here's the link for the pattern: http://sites.google.com/site/sewityourself/
Giving credit where credit is due, here's the link for the pattern: http://sites.google.com/site/sewityourself/
Wednesday, November 10, 2010
Baby Quilt
This goes with the cuddly puppy from my last post. You can't see the colors very well in this photo, but it's green and brown (the colors coordinate with the wall canvases).
Tuesday, November 9, 2010
Cuddly Puppy
Can you tell we're close to having a baby? All my crafts are baby stuff!!
I love this little stuffed puppy. It's so soft and cuddly. I hope our baby loves it just as much as I do.
Monday, November 8, 2010
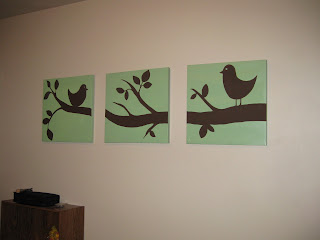
Easy as Paint By Numbers
Does painting your own canvas seem overwhelming? I thought so too. But this turned out so much easier than I ever thought it would be. Here's the 6 easy steps:
1. Buy used canvases from D.I.
2. Spray paint all canvases
3. Find image from online (I used google image search) and print.
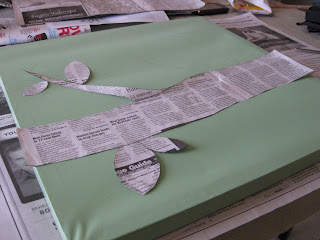
4. Freehand "draw" image on to newspaper. I basically used the google image as my template to freehand the image I wanted, in the right size for my canvases. Trust me, it was easy. With the printed image as your template, it's not really "drawing."
7. Voila! You've done it. All by yourself! Congrats!
1. Buy used canvases from D.I.
2. Spray paint all canvases
3. Find image from online (I used google image search) and print.
4. Freehand "draw" image on to newspaper. I basically used the google image as my template to freehand the image I wanted, in the right size for my canvases. Trust me, it was easy. With the printed image as your template, it's not really "drawing."
5. Place the newspaper drawing on your canvas and trace with a pencil, directly on the canvas.
6. Using craft paint, paint in the lines you've just traced from your newspaper drawing.7. Voila! You've done it. All by yourself! Congrats!
Welcome!
Rather than innundating my family blog with all my crafts, I'm introducing my new blog for all craft things. I can't wait to show you what I've made.
Subscribe to:
Comments (Atom)


